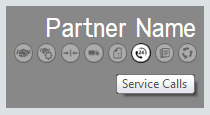
If the Service Calls page is available for the vendor partner you selected, the tile containing the vendor partner's name will include a Service Calls icon.
The Service Calls page displays setup options specific to the selected vendor partner. The following vendor partners (listed alphabetically) have service call settings:

 Canon
CanonIn the Service Calls area, you configure how Dealer Gateway will transmit service call data between Canon and e-automate. Dealer Gateway transmits the following information from Canon to e-automate:
· New service requests
· Updates to service requests originating in e-automate
· Cancellations of service request originating from Canon
Dealer Gateway transmits service call information from e-automate to Canon only for the e-automate customers you map to Canon account numbers.
To facilitate communication between Canon and e-automate, you map the following information between the two systems:
· Call Types
· Call Cancellation Reasons
· On Hold Codes
· Problem Codes
· Repair Codes
Additionally, you specify the following default values, some of which are designed to handle situations where codes used in one system are not mapped to codes used in the other system:
· Dealer call type
· Dealer cancel code
· Partner cancel code
· Partner problem code
· Partner repair code
Service
Calls RequirementsCurrently, service calls are only supported on e-automate version 8.5 and above. For this feature to work, you must have ESN installed (876 or greater).
For more information on setting up ESN, contact EA Customer Care (e-mail: [email protected]; phone: 866-342-8392).
Service
Calls SettingsTo access the Service Call
Settings, click the  Service Calls icon in the Partners
tile on the Dealer Gateway
home page. The Service Calls Settings
page displays.
Service Calls icon in the Partners
tile on the Dealer Gateway
home page. The Service Calls Settings
page displays.
If you have multiple service ticket
providers for the same vendor partner, your Service
Call Settings page will display a drop-down list (see image
below) that you can use to select the service ticket provider
for whom you want to specify settings on this page. If you have
only one service ticket provider for the selected vendor partner,
you will not see this drop-down list on this page.

From this page, access any of the following tabs.
Customer
Mappings TabIn the left column of the Service Calls Settings page, click the Customer mappings tab to show the Customer mappings region. The Customer mappings region displays the Canon service account number and e-automate customer number mappings. Use this section to identify each e-automate customer for whom you want Dealer Gateway to send service call transaction data from e-automate to Canon via the Dealer Gateway. Note that Dealer Gateway does not use these mappings to include/exclude service call transaction data sent from Canon to e-automate.
In the Customer mappings region, do any of the following:
To add a new mapping, do the following:
Click the [Add] button to open the Add Customer Mapping window.
In the Partner account number field, enter the Canon Service Account Number assigned to the e-automate customer for whom you want to send service call transaction data from e-automate to Canon.
In the Customer number field, enter the e-automate customer number you want to map to the specified Canon Service Account Number.
Click [OK] to save
the mapping and close the Add Customer Mapping
window.
Note: If
you need to map multiple e-automate customer numbers
to the same Canon service
account number, enter one row for each
Canon service account
number and e-automate customer number combination.
To remove an
existing mapping, click the  Remove linked account
icon in the Action
column for the mapping you want to remove.
Remove linked account
icon in the Action
column for the mapping you want to remove.
Note: If you
need to edit an existing mapping, you can delete the
existing mapping that needs to be changed and create
a new mapping with the change.
Dealer
Notifications TabIn the left column of the Service Calls Settings page, click the Dealer notification tab to show the Dealer notification region. In the Dealer notification region, you specify the person(s) you want to receive the dealer notifications and the types of dealer notifications the system should send. Dealer Gateway checks for new notifications every five minutes. When the system detects that one or more new notifications are ready to be sent, the system sends one email with the selected notification(s) to the specified recipient(s).
In the Dealer notification region, do the following:
In the Dispatch email
field, enter the email address(es) of the person
or persons you want to receive the notification
emails. To notify multiple recipients, separate
each e-mail address using the delimiter associated
with your e-mail program (e.g., if your email
program accepts a semicolon as a delimiter, you
could enter [email protected]; [email protected]; [email protected]
to have the system send emails to three e-mail
addresses each time Dealer Gateway sends a notification).
Note:
This field has a limit of 2,000 characters.
To receive
a dealer notification email when Canon adds a
note to an existing service call, check the Note box. If
you check this box and Dealer Gateway sends a
notification email, this portion of the email
will look similar to the following:

To receive
a dealer notification email when Canon cancels
an existing service call, check the Cancel
box. If you check this box and Dealer Gateway
sends a notification email, this portion of the
email will look similar to the following:
To receive
a dealer notification email when Canon creates
a new service call, check the Ticket
box. If you check this box and Dealer Gateway
sends a notification email, this portion of the
email will look similar to the following:
To receive
a dealer notification email when Dealer Gateway
detects an error while attempting to create a
new service call, check the Error
box. If you check this box and Dealer Gateway
sends a notification email, this portion of the
email will look similar to the following:
To save your changes, click the [Save] button.
Call
Defaults Mappings TabIn the left column of the Service Calls Settings page, under Service call mappings, click the Call default mappings tab to show the Call default mappings region.
In the Call default mappings region, do the following:
In the Dealer call
type field, use the drop-down menu to select the
default call type to assign to a service call created
in e-automate from a service call originating in Canon's
system if a mapping is not defined for the call's
call type in the Call
type mappings region of this page.
Note:
ECi recommends you create a new call type in e-automate
Lists and Codes specifically for identifying calls
from Canon. For more information on creating call
types in e-automate, see the "Creating Call Types"
topic in the e-automate help.
In
the Dealer cancel code field, use the
drop-down menu to select the default cancel code to
assign to a service call created in e-automate from
a service call originating in Canon's system if a
mapping is not defined for the call's cancel code
in the Cancel reason
mappings region of this page.
Note:
For information on creating cancel codes in e-automate,
see the "Creating Cancel Codes" topic in
the e-automate help.
The Partner cancel code field is set to Dealer Cancelled by default, and this value cannot be changed. The system uses this cancel code when communicating to Canon that you have cancelled a call in e-automate that should be cancelled in Canon's system.
In the Partner problem code field, use the drop-down menu to select the default problem code the system should assign to a service call in Canon's system when the problem code assigned to the service call in e-automate is not mapped to one of Canon's problem codes in the Problem code mappings region on this page.
In the Partner repair code field, use the drop-down menu to select the default repair code the system should assign to a service call in Canon's system when the repair code assigned to the service call in e-automate is not mapped to one of Canon's repair codes in the Repair code mappings region on this page.
Call
Type Mappings TabIn the left column of the Service Calls Settings page, under Service call mappings, click the Call type mappings tab to show the Call type mappings region. The Call type mappings region lists Canon's call types on the left and a selection box for you to map one of your e-automate call type codes to each of Canon's call type codes.
In
the Call type
mappings region,
for each field, select the e-automate Call Type
(defined in Tools
> Options > Lists and Codes > Call types) you want to map to the selected
call type in Canon's system.
Note: If any of Canon's call types
remain unmapped to a call type in e-automate, the system
will assign the Call
type specified in
the Defaults region of this page when creating
a service call in e-automate from a service call originating
in Canon's system.
Note: For information on creating call
types in e-automate, see the "Creating Call Types"
topic in the e-automate help.
Cancel
Reason Mappings TabIn
the left column of the Service Calls Settings
page, under Service call
mappings, click the Cancel
reason mappings tab to show the Cancel
reason mappings region. The Cancel
reason mappings region lists the eight standard
cancellation reasons identified via the Dealer Gateway.
For each field, select the e-automate Cancel
Code (defined in Tools
> Options > Lists and Codes > Cancel Codes)
you want to map to the selected cancellation reason in
Canon's system.
Note:
Each e-automate Cancel
Code should only be mapped to one standard cancellation
reason; do not map the same e-automate Cancel
Code to more than one standard cancellation reason.
Note:
Vendor partner Canon may send any of the following cancel
codes to e-automate, but will only accept Customer
Cancelled and Duplicate
Call from e-automate. For this reason, you may
want to create vendor-partner-specific cancel codes to
use for each of these call types to facilitate returning
the cancel code to Canon. For information on setting up
cancel codes in e-automate, see the "Creating
Cancel Codes" topic in the e-automate help.
In the Cancel reason mappings region, do the following:
In the Call Not Required field, use the drop-down menu to select the e-automate Cancel Code to which you want to map a cancellation reason of Call Not Required in Canon's system.
In the Contract Dept Request field, use the drop-down menu to select the e-automate Cancel Code to which you want to map a cancellation reason of Contract Department Request in Canon's system.
In the Credit Dept Request field, use the drop-down menu to select the e-automate Cancel Code to which you want to map a cancellation reason of Credit Department Request in Canon's system.
In the Customer Cancelled field,
use the drop-down menu to select the e-automate Cancel Code to which
you want to map a cancellation reason of Customer
Cancelled in Canon's system.
Note: This mapping
is required.
In the Duplicate Call field,
use the drop-down menu to select the e-automate Cancel Code to which
you want to map a cancellation reason of Duplicate
Call in Canon's system.
Note: This mapping
is required.
In the Machine Has Been Returned To Warehouse field, use the drop-down menu to select the e-automate Cancel Code to which you want to map a cancellation reason of Machine Has Been Returned To Warehouse in Canon's system.
In the Manager Request field, use the drop-down menu to select the e-automate Cancel Code to which you want to map a cancellation reason of Manager Request in Canon's system.
In the Technician Request field, use the drop-down menu to select the e-automate Cancel Code to which you want to map a cancellation reason of Technician Request in Canon's system.
On Hold
Mappings TabIn the left column of the Service Calls Settings page, under Service call mappings, click the On hold mappings tab to show the On hold mappings region. The On hold mappings region lists Canon's on hold codes on the left and a selection box for you to map one of your e-automate on hold codes to each of Canon's on hold codes.
In
the On
hold mappings region,
for each field, select the e-automate On Hold Code (defined in Tools
> Options > Lists and Codes > On hold codes) you want to map to the selected
on hold code in Canon's system.
Note: Canon uses
two on hold codes for parts:
Incomplete/High Part Call and Incomplete/Part.
The Incomplete/High Part
Call on-hold code indicates the call is holding
for parts and the equipment is not working. The Incomplete/Part on-hold
code indicates the call is holding for parts but the equipment
is still working.
Note: If any repair codes remain unmapped,
the system will use the Partner
on
hold code specified in the Defaults region of this page.
Problem
Code Mappings TabIn the left column of the Service Calls Settings page, under Service call mappings, click the Problem code mappings tab to show the Problem code mappings region. The Problem code mappings region lists Canon's problem codes on the left and a selection box for you to map one of your e-automate problem codes to each of Canon's problem codes.
In
the Problem
code mappings
region, for each
field, select the e-automate Problem Code
(defined in Tools
> Options > Lists and Codes > Problem codes) you want to map to the selected
problem code in Canon's system.
Note: If any problem codes remain unmapped,
the system will use the Partner
problem code specified
in the Defaults region of this page.
Note: For information on creating problem
codes in e-automate, see the "Creating Problem Codes"
topic in the e-automate help.
Repair
Code Mappings TabIn the left column of the Service Calls Settings page, under Service call mappings, click the Repair code mappings tab to show the Repair code mappings region. The Repair code mappings region lists Canon's repair codes on the left and a selection box for you to map one of your e-automate repair codes to each of Canon's repair codes.
In
the Repair
code mappings
region, for each field,
select the e-automate Repair Code
(defined in Tools
> Options > Lists and Codes > Repair codes) you want to map to a repair
code in Canon's system.
Note: If any repair codes remain unmapped,
the system will use the Partner
repair
code specified in the Defaults region of this page.
Note: For information on creating repair
codes in e-automate, see the "Creating Repair Codes"
topic in the e-automate help.
New Calls
from CanonWhen Dealer Gateway creates a service call in e-automate from a request sent by Canon, Dealer Gateway uses the model and serial number supplied by Canon to look up the equipment in e-automate. If the equipment exists in e-automate, Dealer Gateway uses the customer and technician assigned to the equipment in e-automate and the call type specified in the dealer profile. If the equipment does not exist in e-automate, Dealer Gateway uses the customer, technician, and call type specified in the dealer profile.
When creating the call, Canon provides additional information with which Dealer Gateway will populate the following fields when the call is created in e-automate:
Caller: Person requesting the service.
Problem Description: Includes the vendor partner’s problem code and description. If the equipment is unknown, the problem description also includes the equipment make, model, and serial number.
Address: Address where equipment is located.
Due By: Date by which the call must be resolved or completed.
PO number: PO number associated with the service call.
Service Call Primary
Note: Any notes the vendor partner provides for the service
call.
Note:
Entered in the service call
primary note, not the work order primary note.
Updates
from CanonWhen Canon sends an update to an existing Canon service call, Dealer Gateway updates the following fields in the service call in e-automate:
Problem Description: Includes the vendor partner problem code and description.
PO number: PO number associated with the service call.
Service Call Primary
Note: Any notes the vendor partner provides for the service
call. The previous primary note will be placed as a Prior
Primary Note (PPN). In e-automate whenever the primary note
gets changed, the old one is placed under notes with the note
type set as PPN.
Note:
Entered in the service call
primary note, not the work order primary note.
Cancellations
from CanonWhen Canon cancels a service call, Dealer Gateway updates the following fields in the service call in e-automate:
Status: Displays Cancelled.
Cancel code: Indicates the reason the call was cancelled.
Cancel note: Cancel code description.
Cancel date: Date on which the call was cancelled.
RicohIn the Service calls area you have the ability to configure Dealer Gateway to receive service requests from Ricoh. When Ricoh sends a service request, Dealer Gateway automatically creates a service call in e-automate. Ricoh can also update or cancel one of their existing service calls in e-automate.
Service
Calls RequirementsCurrently, service calls are only supported on e-automate version 8.5 and above. For this feature to work, you must have ESN installed (876 or greater).
For more information on setting up ESN, contact EA Customer Care (e-mail: [email protected]; phone: 866-342-8392).
Service
Calls SettingsTo access the Service Call Settings, do the following:
Click the Service Calls
icon in the Partners
tile on the Dealer Gateway
home page. The Service Calls Settings
page displays.
In the Defaults region, do the following:
In the Call
type field, use the drop-down menu to select the default
call type to assign to a service call created in e-automate
from a service call originating in Ricoh's system.
Note:
ECi recommends you create a new call type in e-automate
Lists and Codes specifically for identifying calls from
Ricoh. For more information on creating call types in
e-automate, see the "Creating Call Types" topic
in the e-automate help.
In the Technician field, use the drop-down menu to select the default technician to which the call will be assigned when a call is created for an unknown equipment. This can be set to the unassigned (UA) technician or any other technician.
In the Unknown
caller field, use the drop-down menu to select the
default customer that will be assigned when a call is
created for an unknown equipment. If the system displays
the message "The customer list is too long..."
to the right of this field, enter 3 characters to begin
the search and then use the drop-down menu to select the
appropriate customer.
Note:
After you enter the third
character in this field, the system initiates the search
and returns matches where the three alpha and/or numeric
characters you enter match the first three characters
in a customer number and/or the first three characters
in a word in the character name.
Note:
ECi recommends this be a
separate dedicated vendor partner (i.e., Ricoh) Service
Call customer.
In
the Cancel code field, use the drop-down
menu to select the default cancel code used when the vendor
partner initiates a cancellation of the call. The vendor
partner has the ability to cancel the call on their end,
and the update will be pushed through and cancel in e-automate
as well.
Note:
ECi recommends you create
a new vendor-partner-specific cancel code (i.e., a Ricoh
cancel code) in e-automate Lists and Codes.
New Calls
from RicohWhen Dealer Gateway creates a service call in e-automate from a request sent by Ricoh, Dealer Gateway uses the model and serial number supplied by the vendor partner to look up the equipment in e-automate. If the equipment exists in e-automate, Dealer Gateway uses the customer and technician assigned to the equipment in e-automate and the call type specified in the dealer profile. If the equipment does not exist in e-automate, Dealer Gateway uses the customer, technician, and call type specified in the dealer profile.
When creating the call, the vendor partner provides additional information with which Dealer Gateway will populate the following fields when the call is created in e-automate:
Caller: Person requesting the service.
Problem Description: Includes the vendor partner’s problem code and description. If the equipment is unknown, the problem description also includes the equipment make, model, and serial number.
Address: Address where equipment is located.
Due By: Date by which the call must be resolved or completed.
PO number: PO number associated with the service call.
Service Call Primary
Note: Any notes the vendor partner provides for the service
call.
Note:
Entered in the service call
primary note, not the work order primary note.
Handling
Unknown Equipment CallsWhen a call comes in for a model-and-serial combination that is not found in an existing equipment record in e-automate, a call is created for an unknown equipment under the customer specified in the Unknown caller setting in Dealer Gateway. The problem description field in the call includes enough information (Make, Model, and Serial Number) to create an equipment record for the equipment. Create the equipment record under the Unknown caller customer, and replace the unknown equipment with the equipment you just created. Once this is set, if you want to change the customer the equipment is assigned to, you may do so by editing the equipment record.
Note: Do not cancel the call for the purposes of creating a new call under a different customer. Cancelling the call in e-automate will cancel the call in the vendor partner system as well.
Updates
from RicohWhen the vendor partner sends an update to an existing vendor partner service call, Dealer Gateway updates the following fields in the service call in e-automate:
Problem Description: Includes the vendor partner problem code and description.
PO number: PO number associated with the service call.
Service Call Primary
Note: Any notes the vendor partner provides for the service
call. The previous primary note will be placed as a Prior
Primary Note (PPN). In e-automate whenever the primary note
gets changed, the old one is placed under notes with the note
type set as PPN.
Note:
Entered in the service call
primary note, not the work order primary note.
Cancellations
from RicohWhen Ricoh cancels a service call, Dealer Gateway updates the following fields in the service call in e-automate:
Status: Displays Cancelled.
Cancel code: Indicates the reason the call was cancelled.
Cancel note: Cancel code description.
Cancel date: Date on which the call was cancelled.
XeroxIn the Service calls area you have the ability to configure Dealer Gateway for bidirectional service call communication between XSM and e-automate. When XSM and e-automate are integrated, changes to service call information in either system trigger corresponding changes to service call information in the other system using the mappings between the two systems listed in the following table:
XSM |
E-automate |
Incident Status |
Status |
Equipment Make |
Make |
Equipment Model |
Model |
Equipment Serial Number |
Serial Number |
Customer |
Caller First and Last Name |
Summary and Description |
Problem Description |
Date Occurred |
Call Received At |
Service Calls
RequirementsCurrently, service calls are only supported on e-automate version 8.5 and above. For this feature to work, you must have ESN installed (876 or greater).
For more information on setting up ESN, contact EA Customer Care (e-mail: [email protected]; phone: 866-342-8392).
Service
Calls SettingsTo access the Service Call
Settings, click the
Service Calls icon in the Partners
tile on the Dealer Gateway
home page. The Service Calls Settings
page displays.
If your Partner
Profile page's Service
Registrations area lists multiple service ticket Providers for the same vendor
partner, your Service Call Settings
page will display a drop-down list (see image below) from which
to select the service ticket provider for whom you want to specify
settings on this page. If you have only one service ticket provider
for the selected vendor partner, you will not see this drop-down
list on this page.
From this page, access any of the following tabs:
Customer
Mappings TabIn the left column of the Service Calls Settings page, click the Customer mappings tab to show the Customer mappings region.
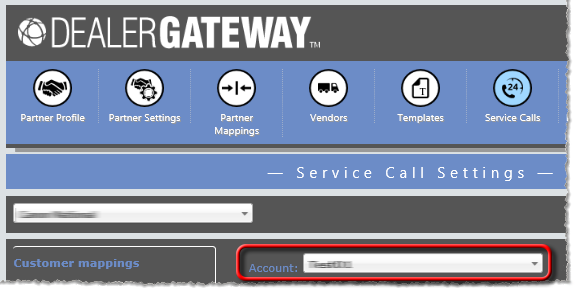
If your Partner Profile page's
Service Registrations
area lists multiple Provider
Account Numbers for the same service ticket Provider for the same
vendor partner, the
Customer mappings region of your Service
Call Settings page will display an Account
drop-down list (see image below) from which to select
the provider account number for which you want to specify
customer mappings. If you have only one provider account
number per service ticket provider for the same vendor
partner, you will not see this drop-down list on this
page.
The Customer mappings region displays the Xerox account number and e-automate customer number mappings. Use this section to identify each e-automate customer for whom you want Dealer Gateway to send service call transaction data from e-automate to Xerox via the Dealer Gateway. Note that Dealer Gateway does not use these mappings to include/exclude service call transaction data sent from Xerox to e-automate.
In the Customer mappings region, do any of the following:
To add a new mapping, do the following:
Click the [Add] button to open the Add Customer Mapping window.
In the Partner account number field, enter the number Xerox assigned to a specific customer for whom you want to send service call transaction data from e-automate to Xerox.
In the Customer number field, enter the number assigned to the same customer in e-automate.
Click [OK] to save the mapping and to leave the Add Customer Mapping window open for adding the next customer mapping.
When finished, click the [Cancel] button or toolbar [Close] icon to close the Add Customer Mapping window.
To remove an
existing mapping, click the
Remove linked account
icon in the Action
column for the mapping you want to remove.
Dealer
Notification TabIn the left column of the Service Calls Settings page, click the Dealer notification tab to show the Dealer notification region. In the Dealer notification region, you specify the person(s) you want to receive the dealer notifications and the types of dealer notifications the system should send. Dealer Gateway checks for new notifications every five minutes. When the system detects that one or more new notifications are ready to be sent, the system sends one email with the selected notification(s) to the specified recipient(s).
In the Dealer notification region, do the following:
In the Dispatch email
field, enter the email address(es) of the person
or persons you want to receive the notification
emails. To notify multiple recipients, separate
each e-mail address using the delimiter associated
with your e-mail program (e.g., if your email
program accepts a semicolon as a delimiter, you
could enter [email protected]; [email protected]; [email protected]
to have the system send emails to three e-mail
addresses each time Dealer Gateway sends a notification).
Note:
This field has a limit of 2,000 characters.
To receive
a dealer notification email when Canon adds a
note to an existing service call, check the Note box. If
you check this box and Dealer Gateway sends a
notification email, this portion of the email
will look similar to the following:
To receive
a dealer notification email when Canon cancels
an existing service call, check the Cancel
box. If you check this box and Dealer Gateway
sends a notification email, this portion of the
email will look similar to the following:
To receive
a dealer notification email when Canon creates
a new service call, check the Ticket
box. If you check this box and Dealer Gateway
sends a notification email, this portion of the
email will look similar to the following:
To receive
a dealer notification email when Dealer Gateway
detects an error while attempting to create a
new service call, check the Error
box. If you check this box and Dealer Gateway
sends a notification email, this portion of the
email will look similar to the following:
To save your changes, click the [Save] button.
Call
Default Mappings TabIn the left column of the Service Calls Settings page, under Service call mappings, click the Call default mappings tab to show the Call default mappings region.
In the Call default mappings region, do the following:
In the Dealer call
type field, use the drop-down menu to select the
default call type to assign to a service call created
in e-automate based on a new incident in XSM.
Note:
ECi recommends you create a new call type in e-automate
Lists and Codes specifically for identifying calls
from Xerox. For more information on creating call
types in e-automate, see the "Creating Call Types"
topic in the e-automate help.
In
the Dealer cancel code field, use the
drop-down menu to select the default cancel code to
use when the vendor partner initiates a cancel of
the call. The vendor partner has the ability to cancel
the call on their end, and the update will be pushed
through and cancel in e-automate as well.
Note:
ECi recommends you create
a new vendor-partner-specific cancel code (i.e., one
for Xerox cancels) in e-automate Lists and Codes.
In the Partner cancel code field, use the drop-down menu to select the default partner cancel code the system should assign to a new incident created in XSM based on a service call that originated in e-automate.
If you want the system to automatically exclude supply fulfillment service calls, leave the Synchronize supply fulfillment tickets checkbox unchecked (the default setting); if you want the system to include supply fulfillment service calls, check the Synchronize supply fulfillment tickets checkbox.
In
the Partner
problem code
field, use the drop-down menu to select the default
problem code the system should assign to a new incident
created in XSM based on a service call that originated
in e-automate.
Note: Currently, Xerox does not
use this feature.
In
the Dealer problem
code field, use the drop-down menu to select
the default problem code the system should assign
to a service call created in e-automate based on a
new incident that originated in XSM.
Note:
Currently, Xerox does not use this feature.
In
the Partner repair
code field, use the drop-down menu to select
the default repair code the system should assign to
a new incident created in XSM based on a service call
that originated in e-automate.
Note:
Currently, Xerox does not use this feature.
In
the Dealer repair
code field, use the drop-down menu to select
the default repair code the system should assign to
a service call created in e-automate based on a new
incident that originated in XSM.
Note:
Currently, Xerox does not use this feature.
In
the Partner hold
code field, use the drop-down menu to select
the default on hold code the system should assign
to a new incident created in XSM based on a service
call that originated in e-automate.
Note:
Currently, Xerox does not use this feature.
In
the Dealer hold code
field, use the drop-down menu to select the default
on hold code the system should assign to a service
call created in e-automate based on a new incident
that originated in XSM.
Note:
Currently, Xerox does not use this feature.
Call
Status Mappings TabIn the left column of the Service Calls Settings page, under Service call mappings, click the Call status mappings tab to show the Call status mappings region. The Call status mappings region lists Xerox's call status codes on the left and a selection box for you to map one of your e-automate call status codes to each of Xerox's call status codes.
In
the Call
status mappings
region, for each
field, select the e-automate Call
Status Code you want
to map to the selected call status code in Xerox's system.
Note: There is no default call
status, so you need to map every Xerox call status code
to an e-automate Call
Status Code. You can map the same e-automate
Call
Status Code to multiple Xerox call status codes.
Call
Type Mappings TabIn the left column of the Service Calls Settings page, under Service call mappings, click the Call type mappings tab to show the Call type mappings region. The Call type mappings region lists Xerox's call types on the left and a selection box for you to map one of your e-automate call type codes to each of Xerox's call type codes.
In
the Call type
mappings region,
for each field, select the e-automate Call Type
(defined in Tools
> Options > Lists and Codes > Call types) you want to map to the selected
call type in Xerox's system.
Note: If any of Xerox's call types
remain unmapped to a call type in e-automate, the system
will assign the Call
type specified in
the Defaults region of this page when creating
a service call in e-automate from a service call originating
in Xerox's system.
Note: For information on creating call
types in e-automate, see the "Creating Call Types"
topic in the e-automate help.
Cancel
Reason Mappings TabIn
the left column of the Service Calls Settings
page, under Service call
mappings, click the Cancel
reason mappings tab to show the Cancel
reason mappings region. The Cancel
reason mappings region lists the five standard
cancellation reasons identified via the Dealer Gateway.
For each field, select the e-automate Cancel
Code (defined in Tools
> Options > Lists and Codes > Cancel Codes)
you want to map to the selected cancellation reason in
Xerox's system.
Note:
Each e-automate Cancel
Code should only be mapped to one standard cancellation
reason; do not map the same e-automate Cancel
Code to more than one standard cancellation reason.
In the Cancel reason mappings region, do the following:
In the Cancelled field, use the drop-down menu to select the e-automate Cancel Code to which you want to map a cancellation reason of Cancelled in Xerox's system.
In the Cancelled Internal field, use the drop-down menu to select the e-automate Cancel Code to which you want to map a cancellation reason of Cancelled Internal in Xerox's system.
In the Duplicate Incident field, use the drop-down menu to select the e-automate Cancel Code to which you want to map a cancellation reason of Duplicate Incident in Xerox's system.
In the Duplicate Ticket field, use the drop-down menu to select the e-automate Cancel Code to which you want to map a cancellation reason of Duplicate Ticket in Xerox's system.
In the Query Cancelled field, use the drop-down menu to select the e-automate Cancel Code to which you want to map a cancellation reason of Query Cancelled in Xerox's system.
On
Hold Mappings TabIn the left column of the Service Calls Settings page, under Service call mappings, click the On hold mappings tab to show the On hold mappings region. The On hold mappings region lists Xerox's on hold codes on the left and a selection box for you to map one of your e-automate on hold codes to each of Xerox's on hold codes.
In
the On
hold mappings region,
for each field, select the e-automate On Hold Code (defined in Tools
> Options > Lists and Codes > On hold codes) you want to map to the selected
on hold code in Xerox's system.
Note: If any repair codes remain unmapped,
the system will use the applicable Partner
on
hold code or Dealer
on hold code specified
in the Defaults region of this page.
Problem
Code Mappings TabIn the left column of the Service Calls Settings page, under Service call mappings, click the Problem code mappings tab to show the Problem code mappings region. The Problem code mappings region lists Xerox's problem codes on the left and a selection box for you to map one of your e-automate problem codes to each of Xerox's problem codes.
In
the Problem
code mappings
region, for each
field, select the e-automate Problem Code
(defined in Tools
> Options > Lists and Codes > Problem codes) you want to map to the selected
problem code in Xerox's system.
Note: If any problem codes remain unmapped,
the system will use the applicable Partner
problem code or Dealer problem
code specified in
the Defaults region of this page.
Note: For information on creating problem
codes in e-automate, see the "Creating Problem Codes"
topic in the e-automate help.
Repair
Code Mappings TabIn the left column of the Service Calls Settings page, under Service call mappings, click the Repair code mappings tab to show the Repair code mappings region. The Repair code mappings region lists Xerox's repair codes on the left and a selection box for you to map one of your e-automate repair codes to each of Xerox's repair codes.
In
the Repair
code mappings
region, for each field,
select the e-automate Repair Code
(defined in Tools
> Options > Lists and Codes > Repair codes) you want to map to a repair
code in Xerox's system.
Note: If any repair codes remain unmapped,
the system will use the applicable Partner
repair
code or Dealer
repair code specified
in the Defaults region of this page.
Note: For information on creating repair
codes in e-automate, see the "Creating Repair Codes"
topic in the e-automate help.
New Calls
Created in e-automate from XSM IncidentsWhen Dealer Gateway creates a service call in e-automate from a request sent by Xerox, Dealer Gateway uses the model and serial number supplied by the vendor partner to look up the equipment in e-automate. If the equipment exists in e-automate, Dealer Gateway uses the customer and technician assigned to the equipment in e-automate and the call type specified in the dealer profile. If the equipment does not exist in e-automate, Dealer Gateway uses the customer, technician, and call type specified in the dealer profile.
When creating the call, the vendor partner provides additional information with which Dealer Gateway will populate the following fields when the call is created in e-automate:
Caller: Person requesting the service.
Problem Description: Includes the vendor partner’s problem code and description. If the equipment is unknown, the problem description also includes the equipment make, model, and serial number.
Address: Address where equipment is located.
Due By: Date by which the call must be resolved or completed.
PO number: PO number associated with the service call.
Service Call Primary
Note: Any notes the vendor partner provides for the service
call.
Note:
Entered in the service call
primary note, not the work order primary note.
When a new incident is created via XSM:
If the XSM Asset exists in e-automate, a service call is created in e-automate with:
The Default call type specified in Dealer Gateway
The Default technician specified in Dealer Gateway
If the XSM Asset does not exist in e-automate, a call for unknown equipment is created in e-automate with:
A Problem Description that contains the equipment information and the problem description from XSM
A blank Equipment field
The Customer
field set to the Default
unknown caller specified in Dealer Gateway
The new call is visible via e-automate, e-info, DeskTech, and RemoteTech, typically within one-to-two minutes of the new incident's having been created in XSM.
New
Incidents Created in XSM from e-automate callsWhen a new service call is created via e-automate:
A new incident is created in XSM only if:
The e-automate call includes, at minimum, the equipment, problem description, caller, and call type
The tech assigned
to the call is a group member of the Unassigned Group
set up in RSM
Note: If a new service
call is entered in e-automate for the unassigned technician,
the call is not generated in XSM until it has been re-assigned
to a technician who is a group member of the Unassigned
Group set up in RSM
The e-automate model
exactly matches the Xerox model
Note: If the models
do not match exactly (spaces and case-sensitivity included),
Xerox does not recognize the model and therefore
does not map the call.
The new call is created in XSM with a Status of In Progress.
The new incident is visible via XSM, typically within one-to-two minutes of the new call's having been created in e-automate.
Handling
Unknown Equipment CallsWhen a call comes in for a model-and-serial combination that is not found in an existing equipment record in e-automate, a call is created for an unknown equipment under the customer specified in the Unknown caller setting in Dealer Gateway. The problem description field in the call includes enough information (Make, Model, and Serial Number) to create an equipment record for the equipment. Create the equipment record under the Unknown caller customer, and replace the unknown equipment with the equipment you just created. Once this is set, if you want to change the customer the equipment is assigned to, you may do so by editing the equipment record.
Note: Do not cancel the call for the purposes of creating a new call under a different customer. Cancelling the call in e-automate will cancel the call in the vendor partner system as well.
Updates
to e-automate calls from XSMWhen the status of an incident
is updated in XSM, Dealer Gateway updates the Status
of the existing call in e-automate as follows:
Status Update from XSM |
Resulting E-automate Status Update |
In Progress |
Pending |
On Hold * |
On Hold |
Open New |
Pending |
Cancel |
Cancelled |
Closed |
Completed |
The following updates also occur in e-automate when an incident
is updated in XSM:
Problem Description: Includes the XSM problem code and description.
PO number: PO number associated with the service call.
Service Call Primary
Note: Any notes XSM provides for the service call. The
previous primary note will be placed as a Prior Primary Note
(PPN). Whenever the primary note gets changed in e-automate,
the old one is placed under notes with the note type set to
PPN.
Note:
The note is entered in the service
call primary note, not the work order primary note.
Updates made to existing incidents via XSM are typically visible via e-automate, e-info, DeskTech, and RemoteTech in one-to-two minutes.
Changes to the following items in an XSM incident are not updated in the e-automate service call:
Labor
Meter Readings
Parts
Notes
Updates
to XSM Incidents from e-automateWhen the status of a service call
is updated in e-automate, Dealer Gateway updates the Status
of the existing incident in XSM as follows:
Status Update from E-automate |
Resulting XSM Status Update |
Pending |
In Progress |
On Hold |
On Hold* |
Cancelled |
Cancelled |
Invoiced, Completed, Cleared, OK to Invoice |
Closed |
* A ticket will only be put on
hold in XSM if the ticket originated from e-automate.
Updates made to cancelled or closed calls via e-automate are only updated in XSM once per hour; as a result, updates made via e-automate to existing calls could take up to one hour to be visible via XSM.
Changes to the following items in an XSM incident are not updated in the e-automate service call:
Labor
Meter Readings
Parts
Notes
Cancellations
from Vendor PartnerWhen the vendor partner cancels a service call, Dealer Gateway updates the following fields in the service call in e-automate.
Status: Displays Cancelled.
Cancel code: Indicates the reason the call was cancelled.
Cancel note: Cancel code description.
Cancel date: Date on which the call was cancelled.

© 2020 ECI Software Solutions, Inc. -
All Rights Reserved